 Follow
The sun is a great supplier! The solar energy from a single day can meet all the needs of the planet for a few months. The challenge, however, has been in capturing this tremendous energy in a usable form. Like many things great and grand, we can make a humble beginning in this endeavor too. It turns out that with a little patience and effort, we can generate usable solar energy at our own homes. Since this is a DIY, the end result will come at a very economical cost. Let us get to the tutorial right away.

Difficulty level
This can be set to ‘moderate’. Requires some basic knowledge about drilling and making electrical connections, but any adult can easily venture into this project without much worry.
Time Required
About one to two hours must be sufficient once you have the necessary materials ready. This is a lovely DIY project to occupy a lazy Sunday afternoon.
Resources Required
- A small solar panel rated 12V or above.
- Deep cycle, rechargeable, 12V lead/acid or gel batteries.
- A battery box to cover the exposed terminals.
- A triple inlet model DC input ( adapter) for 12V to act as charge controller.
- An inverter to convert the battery-stored DC power to AC power.
- A multimeter to get various readings
- Few lengths of insulated wire
- A wire stripper
- A drill
- Bungee cords
Estimated Cost
You would be able to build a generator for under $300 and we are not going to crank up the prices! Maybe we shall enlist probable prices to help you in your purchase. The solar panel would cost about $100. Bought at a bargain, the batteries would cost about $50-60. The battery box is about $25 and the DC input will cost another $10. The inverter will cost about $50-100.
Instructions
- Use the drill to attach the multimeter and the DC input on top of the battery box.
- Start connecting the wires by matching the polarities ( + and – ).
- Connect the solar panel to the DC input or the adapter.
- Connect the DC inlet or adapter to the batteries. The red wires depict the positive terminals while the grey wires depict the negative terminal.

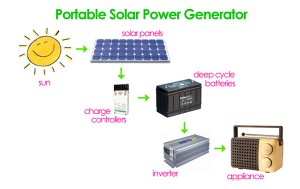
Initial connectionsThis diagram shows how you connect the solar panel to the batteries via the charge controller or DC inlet.
- Connect the batteries to the inverter. Some batteries have separate input and output terminals, some do not. If the battery has separate terminals, connect the output terminals to the inverter and input terminals to the DC inlet or adapter. If there is only one terminal each for the positive and negative on the battery, both the wires ( from the inverter and the DC inlet) go to the same terminals ( positive to positive and negative to negative).
- You can use a bungee cord to keep all the parts together.
- Your completed connections must be in the order as shown in the diagram at the beginning of the tutorial. Please check it once before finalizing the generator. The solar generator is now ready for use.
Frequently Asked Questions
1) For making the solar energy generator, could I make use of car batteries?
Car batteries are not deep cycle batteries. They are cranking batteries for occasional use, like starting your engine. Since our use is going to be continuous in nature, it is imperative that you use deep cycle, rechargeable batteries.
2) There are so many inverters available. Which is the best one to purchase?
Quality always comes with a price. The better quality of inverter you choose, the more it will cost you. That apart, it would be recommended that you make a rough estimate of the watts you would be using. For instance, to use a television (=60W) and a DVD player (=20W), you would need about 80W. You will have to necessarily get an inverter that gives you the desired wattage.
3) Do I need the DC inlet or adapter? Can I not connect the solar panel directly to the batteries?
If you notice, the DC inlet or adapter has the same specifics as the batteries (viz. 12V). This inlet is necessary as a charge controller. If not for this, surges in current may damage the batteries.
Quick Tips
- You could do a little more for the environment by getting ‘green’ rechargeable batteries from companies like batteries.com or Greenbatteries Store.
- If you are installing your generator in a pumpshed, garage or boat, you could save a few more dollars by avoiding the purchase of the battery box which is meant only to keep children safe.
- You could look at the DC input of appliances like fans, hair dryers, lights etc. to get a good idea of the DC input to purchase.
- The solar panel, the DC inlet, the batteries and the inverter have clear labels for the positive and negative terminals. Just refer to them as you make the connections.
- Connect all the negative terminals first and then connect the positive terminals.
- It will take about 5-8 hours to recharge a dead battery and about 1-3 hours to recharge a weak one.
- If it is your first time and you are a bit diffident, you could check the connections by making a diagram and getting it certified by your local electrician.
Things to watch out for
- While making the connections, handle only one wire at a time. This will save you a lot of confusion.
- Keep the solar panel covered and in the shade while making the connections. We do not want any shocking experiences along the way.
- This construction is scalable and can be made with larger panels, batteries and inverters. It is better to start small and then replicate the success to bigger projects.