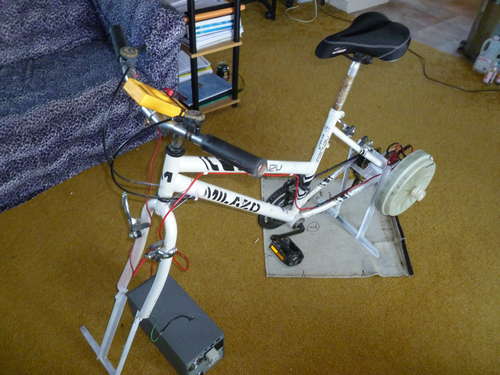
If you were a puzzle fan in your childhood or if you simply love building things, you now have the chance to make a most surprising combination: a power-generating exercise bike out of a washing machine. So you get a double effect from a work-out: great legs and power for your house!
A regular routine will get you support for, let’s say, a 50W consumer and a 21” monitor. You basically need a washing machine motor and an old bicycle as basic parts, but also a bridge rectifier, an old UPS and a battery, a 20-gauge wire angle, soldering iron and a cheap multimeter. A soldering and a welding setup will definitely come in handy and don’t forget to bring in an angle grinder with cutoff wheels.
 Don’t worry about the washing machine, because you can easily get one for free or at a modest price if they’re beyond repair. Fisher & Paykel, LG and Whirlpool, they all have the recommendable SmartDrive motors in them. The same goes for the UPS and the batteries – you can get used ones from your local computer shop. An old car alternator can be the source for the bridge rectifier.
For the generator to do a good job, you should re-wire the windings of the stator. One possibility includes rewiring a 42-pole stator 3 times to get 7 groups of 2 poles for a 24v configuration. For a start, cut the shaft off 10 1/2″ overall, then position the chainring cassette over the cut end of the shaft. If there are any inconsistencies between the ID of the cassette and the one of the motor shaft, it’s ideal to use a metal lathe to have your work eased out for you.
As a first step, the wheels of the bike must come off to be replaced with upright sections of 3/4″ angle iron, without throwing away the chainring cassette off of the rear wheel.
 The advantage is that you can establish your own height of the bike as long as the pedals are at the right level. Make sure you stabilize the bike by welding something to the bottom of the uprights; you may also consider adding a short section of angle between the fork and the frame to prevent it from turning.
Next, the right side of the rear fork must be left intact to have the derailleur set up, whereas the left half is meant to receive the motor shaft, for which a piece of 3″x3″ square steel tubing should do the job if welded directly.
An important aspect is that the motor shaft has to be on the same axis as the ex-rear axle of the bike, so the securing of the shaft bearing assembly must consist of a strong piece. The painting should only be done after you make sure everything is working fine.
 The bridge rectifier comes in play once you connect the power to the UPS and look to adjust the AC to DC. Here your options include a 3-phase rectifier or even 3 individual phase rectifiers with their DC outputs positioned together in parallel. The negative wire goes from the rectifier to the ground frame, while the positive one from the back all the way to the UPS in front through the handy eyes.
Finally, as a last step, the ground wire should be ran off of the front of the bike frame, whereas the two wires can be hooked up to the UPS with the help of bisexual 1/4″ spade clip splitters.
To keep things cheap, one could add a multimeter as a finishing touch, instead of a voltmeter gauge. Now you’re left with connecting one of your household appliances to the UPS and hopping onto the bike. Some might argue that the hard part is only now coming!
(Source)

 Follow