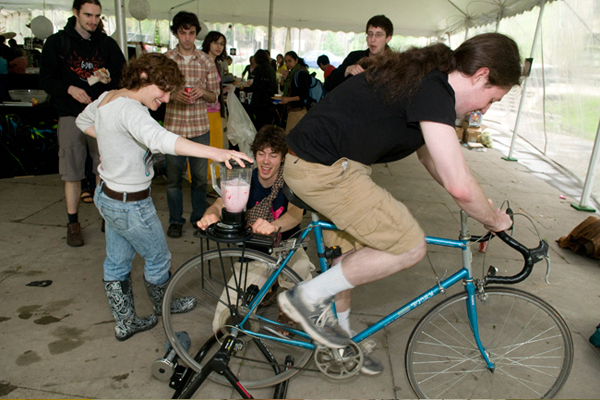
The biking is itself a fun-filled adventure but the excitement increases manifold if it accompanies a blender, is not it? The above picture is of a blender cum bike which allows you to make your smoothies in a remote place of the world without even thinking about any other issues. A neat, fascinating concept altogether, blender on the bike lets you invent newer places with filled. The hobby of biking is pretty common in people of different sections and it be much more cool to incorporate such a device. So, to learn more about the bike go on reading the paragraphs.

Difficulty level: Moderate
Time required: 3-4 hours
Resources required
1. A blender is needed which can be of any brand but Hamilton beach portable one is preferable. The structure, size, quality, and many such aspects are to be considered while choosing the blender.
2. A steady bike is of utmost importance here as you can already gauge.
3. Old tube of bikes is needed to make it properly.
4. The parts of the bike need to be attached with the blender and secondary attachments are also there, so nuts & bolts must be available while making this awesome bike.
5. Bolt is needed which can be made or gathered from a cycle repair shop.
6. Met6al plate is another component in this project which is neglected by most, but if you do not arrange it, the project will get delayed.
7. Diameter wheels are needed which must be present before starting the project of bike blender.
Instructions:
1. Once you lay hand on the blender, get rid of all the useless parts like the cord, bottom plates and everything else.
2. The bottom plates are removed to have peep on the motor. The motor connected with the blades are removed to work with it properly without any hindrance.
3. The wooden supports are made with glue, and 3 pieces of circular wooden structures. The hole saw is used to cut holes in the center and the dry them. After drying them, 2 notches are cut into the cylinder which will allow the cylinders to get stable in between 2 columns.
4. The heads of the two, 7 cm bolts are cut with a vise. Then cut a 4 cm piece from the 3rd bolt.
5. Then the base of the blender is made by a 8 inch piece of wood. The hack saw, may be used to shape the wood structures.
6. The blender is attached on the wooden base so that the jerking a twisting does not displace the blender.
7. The tee nuts must be on the outside and using the hammer the friction wheel is attached properly
8. The bike blender is ready to use.
Frequently asked questions
What is time needed to make this bike blender including this gluing time?
Ans. It may take 5 hours at the most.
Is any blender useful to make this?
Ans. No. You must choose a sleek, short blender.
While biking does the blender give troubles?
Ans. If the glue is properly attached and the wooden structure is aptly pasted and bolted, there will no such problem.
Quick tips
1. Carry some ice with you to make the experience perfect.
2. The parts of the bike must be checked regularly, especially the blender.
3. The tube must be cut into 1 inch pieces to get best results.
Things to watch out for
1. While the blender bottom is slided over the cylinder, make sure the grooves are lined up.
2. The transmission wheels should be screwed on the long bolt.
3. It is better to work under supervision so that the work is completed without any hassles.
4. Strict guidance on the sharp materials must be ensured.
Source: ecofriend
 Follow