 Follow
A battery charger always comes in handy for charging up your exhausted AA or AAA cells (of course the rechargeable ones). Most of the battery chargers available in the market are either AC or DC powered. Though solar powered models are also available, they are quite costly. The DIY model described here is not going to cost you more than $5. It consists of a simple solar panel which converts the solar power into DC output and supplies the same to the battery holder, thus charging up the rechargeable batteries. The benefit of this model is that you can charge up your cells being off the grid, following an eco friendly concept.

Difficulty level
Moderately challenging (may require expertise in few areas)
Time required
The maximum time required is about an hour. A skilled person can do it in 30 minutes.
Resources required
- A transparent moisture proof container
- AA or AAA battery holder
- A pair of AA or AAA sized rechargeable batteries (Type-NiMh, 1.2 volt, 2000 mAH)
- A small solar panel (output-4.5 volt, current – 80 mA)
- A blocking diode
- Soldering iron
- Solder wire
- Connecting wire
- Electrical insulation tape
- Transparent adhesive tape
Estimated cost
The total cost involved in this project is about $4 (price of the tools are excluded).
Instructions
- First of all, mount the two series connected AA or AAA sized batteries onto the battery holder. Solder two wires from the battery holder’s terminals. There after, mount the battery holder arrangement inside the moisture proof container and fix it with the base with the help of an adhesive tape.
- Next, solder two wires on the two terminals of the solar panel. Be very careful while doing the soldering work as it may damage the panel permanently if the semiconductor layer gets overheated. Cover the soldered terminals using insulation tape
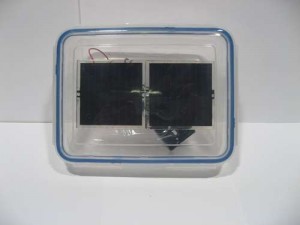
- Fix the solar panel on the top of the container’s cover with lots of transparent adhesive tape. Make sure that the panel is not loose and well covered from rain or water that may fall on it when kept outdoors.
- Next, solder the blocking diode in series with the positive terminal of the battery holder arrangement and the corresponding positive terminal from the solar panel. Solar panels trap the solar energy and charges up the battery when exposed to sunlight. In the dark, these solar panels retract the same energy back from the cells which ultimately damages the panels. To prevent this back-flow of current, a blocking diode has been used here to ensure a one-way flow of current. Make sure that the black end of the diode points in the direction of the batteries. This will only charge up the cells and ensure that they don’t get discharged in the dark by the solar panel itself.
- Next, solder the negative terminal of the solar panel with the negative terminal of the battery holder. That’s it. All the electrical connections are done.
- Make two small holes in the container cover for the wire entry from the solar panel to the inside components.
- Close the container and take it in the sun for charging up the cells.
Frequently asked questions
Can I use a bigger solar panel for faster charging?
Yes, of course you can do so. But make sure that you use a maximum of two such solar panels in parallel (well that will increase the cost as well) which will make the charging current double i.e. 80mA x 2 = 160 mA. This will charge up the cells faster.
Is there any option to provide over current protection for the batteries?
Well some cells come with inbuilt overcharge protection systems. But all you can do to protect any over current condition is to use a low rating fuse in series with the circuit. In that case you need to keep some spare fuses in case of a blown fuse, due to an over current condition.
Quick tips
- Fix the solar panel using clear and transparent tape only. Otherwise a blurry tape may hinder sufficient incidence of sun rays on the panel and produce low power output.
- Fix the components inside the container properly with the base in order to avoid any vibration while taking the solar charger from one place to another.
- Use a good quality soldering flux while doing the soldering works. This will ensure a permanent good quality soldering joint and avoid loose connections.
Things to watch out for
- Never depend upon solar systems completely. Cloudy weathers can affect solar powered gadgets largely. So always carry spare batteries and A.C./D.C. powered battery chargers with you outdoors.
- Rechargeable batteries produce oxygen and hydrogen gases (both are combustible) while charging and discharging. As the arrangement described above is a moisture proof one, there is no space for gas escape. A small short circuit may cause a serious accident. Thus, vents can be provided in the lateral walls of the container to be on the safe side.
- Never try to charge leaked, damaged or dead batteries by the battery charger. This may cause explosion causing accidents.
A battery charger always comes in handy for charging up your exhausted AA or AAA cells (of course the rechargeable ones). Most of the battery chargers available in the market are either AC or DC powered. Though solar powered models are also available, they are quite costly. The DIY model described here is not going to cost you more than $5. It consists of a simple solar panel which converts the solar power into DC output and supplies the same to the battery holder, thus charging up the rechargeable batteries. The benefit of this model is that you can charge up your cells being off the grid, following an eco friendly concept.
Difficulty level
Moderately challenging (may require expertise in few areas)
Time required
The maximum time required is about an hour. A skilled person can do it in 30 minutes.
Resources required
- A transparent moisture proof container
- AA or AAA battery holder
- A pair of AA or AAA sized rechargeable batteries (Type-NiMh, 1.2 volt, 2000 mAH)
- A small solar panel (output-4.5 volt, current – 80 mA)
- A blocking diode
- Soldering iron
- Solder wire
- Connecting wire
- Electrical insulation tape
- Transparent adhesive tape
Estimated cost
The total cost involved in this project is about $4 (price of the tools are excluded).
Instructions
- First of all, mount the two series connected AA or AAA sized batteries onto the battery holder. Solder two wires from the battery holder’s terminals. There after, mount the battery holder arrangement inside the moisture proof container and fix it with the base with the help of an adhesive tape.
- Next, solder two wires on the two terminals of the solar panel. Be very careful while doing the soldering work as it may damage the panel permanently if the semiconductor layer gets overheated. Cover the soldered terminals using insulation tape
- Fix the solar panel on the top of the container’s cover with lots of transparent adhesive tape. Make sure that the panel is not loose and well covered from rain or water that may fall on it when kept outdoors.
- Next, solder the blocking diode in series with the positive terminal of the battery holder arrangement and the corresponding positive terminal from the solar panel. Solar panels trap the solar energy and charges up the battery when exposed to sunlight. In the dark, these solar panels retract the same energy back from the cells which ultimately damages the panels. To prevent this back-flow of current, a blocking diode has been used here to ensure a one-way flow of current. Make sure that the black end of the diode points in the direction of the batteries. This will only charge up the cells and ensure that they don’t get discharged in the dark by the solar panel itself.
- Next, solder the negative terminal of the solar panel with the negative terminal of the battery holder. That’s it. All the electrical connections are done.
- Make two small holes in the container cover for the wire entry from the solar panel to the inside components.
- Close the container and take it in the sun for charging up the cells.
Frequently asked questions
Can I use a bigger solar panel for faster charging?
Yes, of course you can do so. But make sure that you use a maximum of two such solar panels in parallel (well that will increase the cost as well) which will make the charging current double i.e. 80mA x 2 = 160 mA. This will charge up the cells faster.
Is there any option to provide over current protection for the batteries?
Well some cells come with inbuilt overcharge protection systems. But all you can do to protect any over current condition is to use a low rating fuse in series with the circuit. In that case you need to keep some spare fuses in case of a blown fuse, due to an over current condition.
Quick tips
- Fix the solar panel using clear and transparent tape only. Otherwise a blurry tape may hinder sufficient incidence of sun rays on the panel and produce low power output.
- Fix the components inside the container properly with the base in order to avoid any vibration while taking the solar charger from one place to another.
- Use a good quality soldering flux while doing the soldering works. This will ensure a permanent good quality soldering joint and avoid loose connections.
Things to watch out for
- Never depend upon solar systems completely. Cloudy weathers can affect solar powered gadgets largely. So always carry spare batteries and A.C./D.C. powered battery chargers with you outdoors.
- Rechargeable batteries produce oxygen and hydrogen gases (both are combustible) while charging and discharging. As the arrangement described above is a moisture proof one, there is no space for gas escape. A small short circuit may cause a serious accident. Thus, vents can be provided in the lateral walls of the container to be on the safe side.
- Never try to charge leaked, damaged or dead batteries by the battery charger. This may cause explosion causing accidents.
Source: ecofriend